East Kingdom Wiki: https://wiki.eastkingdom.org/index.php?title=Guðrún_Sveinsdóttir
This project was my first experiment with using Viking-era dyeing techniques. My husband needed cold-weather garb for his Viking-era Forester’s Guild kit, so I decided that it would be the perfect project to experiment with dyes. I chose walnut husks because the color is a good one for our Forester’s kit, and I knew walnuts were available to Viking-era Scandinavians: I know of extant examples of walnut-dyed wool from Norway & Denmark, and extant walnut shells in Hedeby (theorized to be imports). I had previously found an old wool blanket at a local thrift store that was a good weight and weave for a tunic, but a rather unflattering shade of beige/gray…ish, with stains. I also found there a whole bag of obviously hand-spun wool yarn (of various ply/weights). I decided to go with the “Use What You Have” mentality and use both for the dye experiment. Thanks to a generous neighbor who let us harvest from his trees, I was able to procure two boxes of black walnuts for the project. While the European type of walnut (Juglans regia, or English walnut) is a different species from the American black walnut (Juglans nigra), and therefore might have slight differences in the dye properties, the two species are close enough chemically to be able to substitute the American variety.
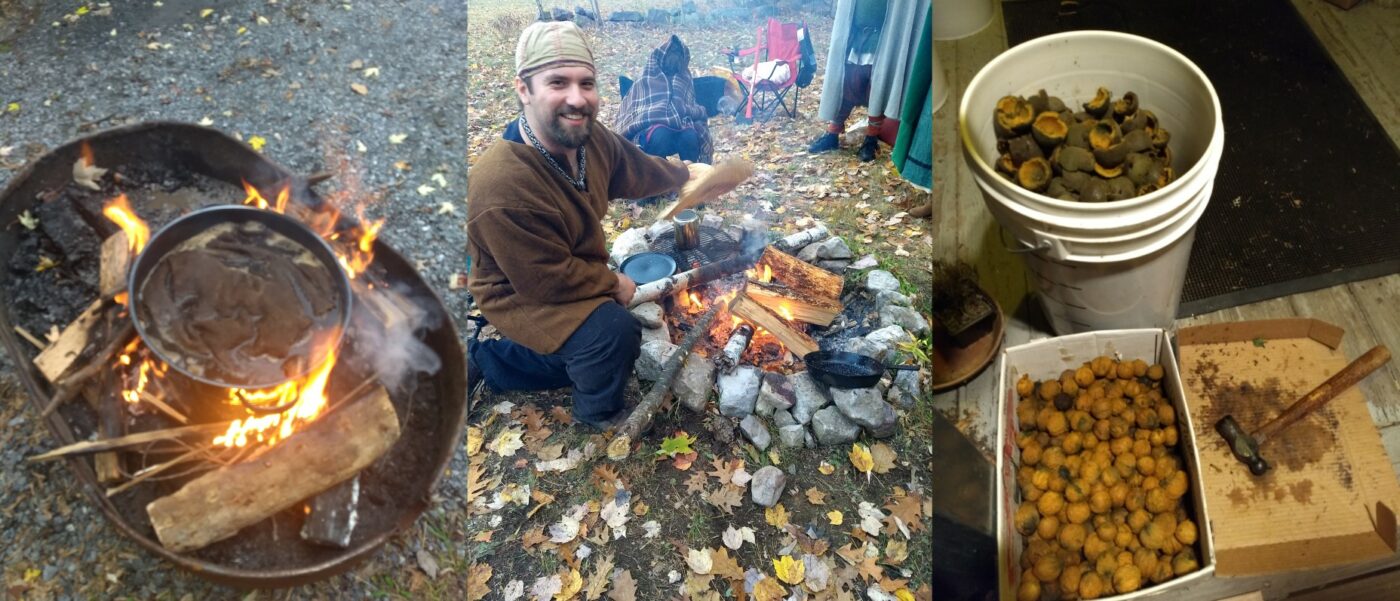
After husking all the walnuts (using gloves and a hammer), the husks weighed in at exactly 20 lbs. I heated water over the outdoor firepit that my husband made, and poured it into a 5-gallon bucket with the husks to steep. While the husks were steeping, I scoured the pre-cut tunic pieces and 4 skeins of hand-spun yarn. I made sure the yarn I chose was all close to the same weight, so that I can use it for a weaving or nålbinding project later. The next step was to drain the husks from the dye bath, to prevent any spotting/unevenness in the dyed fabric. I lined a pot with a large piece of undyed cheesecloth, poured the dye bath in, and caught all the husks in the cloth. After they cooled, I froze them to use in a second dye-bath later. I poured the dye bath back into the bucket, and added 80 mL of iron-rich water to darken (sadden) the dye color. I then added the scoured fabric and yarn, making sure to separate and stir them around to ensure an even dye. I left them in the bucket to try a “cold-dye” method, checking the color and stirring/agitating them each day. After 5 days, I decided to try putting it back on the fire for a hot dye-bath. I heated it over the fire for an hour or so, and this time it (accidentally) reached a rolling boil. I stirred very gently to prevent the wool from felting, and when I took it off the fire, I let the bath cool for 8 hours before taking the wool out to rinse. It took the wool a couple of weeks to hang-dry. I then sewed my husband’s tunic, using the Birka tunic pattern proposed by Carolyn Priest-Dorman. I machine-stitched the structural seams to save my hands (tendonitis), but hand-finished all the seams using a period-correct overcast/whip stitch.
I tried to stick to period techniques whenever possible, including heating my dye bath over the outdoor firepit, but I did have to resort to modern ones occasionally, for reasons of physical limitations, availability of materials, or practicality. For example, I had to pre-scour in modern wool-safe detergent due to the unknowns in the blanket fabric (what was the original dye, what kinds of dirt/grime was it exposed to, and what, if any, detergents were previously used on it?), and I used my bathtub for both scouring and rinsing out the excess dye, since that was my only option if I wanted to try to do those things by hand. But I am pleased with the dye results, and my husband loves his tunic, so my goal was accomplished.
Also, fun fact: due to the active chemical components in walnut husks (mainly juglone), the concentrated dye bath can kill many types of plants, and isn’t great to put down drains, either. My solution was to use it as a weed-killer on our gravel driveway, which worked pretty well
More details, including pictures, video clips, and my full documentation on the project, can be found here: https://docs.google.com/document/d/1cGQVF5xrr19y1NLSHGJZtsNGFqCj8RVNOLoKR0MM6aY
This is impressive!
Thank you! I had fun with it!
This is so cool! I have done a little bit of natural dyeing but never with walnuts, but this makes me want to try it. Thank you so much for sharing!
Thank you! Walnuts are definitely a fun challenge.
I loved the way you used found materials (the walnuts and thrift-store blanket) and period methods in this project.
Thank you! I like repurposing things — it’s both environmentally friendly and within my budget (lol). I did try to use period methods where I could, but I know not all of them were — I know that complete historical authenticity is not really feasible now (there are factors like changes in water pH/minerals over time, plants that were used historically but are now endangered, etc.), but I’m working on getting closer!
What a cool project! Like Lady Adelisa said, it’s so cool that you used readily-available materials for your dyeing project.
Thank you! I definitely had fun with it!
Great writeup! I really like the videos and step by step discussion.
Thank you! I tried to be thorough — glad you liked it!
I LOVED this – I got access to black walnuts a couple of years ago and made concentrated dye that I am not very eager to try after seeing your final results!
Thanks for mentioning the dye’s toxicity – good job using the water as double duty weed killer
Thank you! Dyeing takes a lot of work, but it’s really fun to see the results. That’s cool that you made walnut dye! I bet it’ll turn out beautifully…there are so many things you can do to play around with the final color.
I felt that the potential toxicity was important to mention — I would hate for someone to accidentally kill their garden. I do like making use of every part of the process (as much as humanly possible), so I’m glad the weed-killer idea worked!
Thank you for such excellent documentation and a fine result! I am sure your husband will be proud to have this in his kit.
Thank you! And he absolutely loves it, which was my biggest goal.
What an impressive project. The end result must be treasured.
Thank you! I’m glad it turned out well, and it was fun to try it!
Great project! The final color of the tunic is such a beautiful brown. Dying with walnut is on my project wish list, it was great to see how you did it. Thank you so much for sharing your process.
Thank you! I’d love to see your results if you have a chance to try it! It’s a lot of fun, even if it’s a bit labor-intensive.
I love your “let’s give it a try” approach here, with materials to hand. Good to know about the concentrated dye bath!
Thank you! I do love trying new arts & repurposing things. And yes, the potential dye bath toxicity is important to know…you’re welcome!
What a wonderful project thank you for sharing it. Well done!
Thank you! I had fun with it!
Wonderful work!
Thank you! I’m glad it turned out well!
This is great. I really liked the snip-its of the process on video. Way to go not putting yourself in dire straits for the sake of authenticity. Thank you so much.
Thank you! Yes, I feel strongly that if my end goal is to have a wearable item, then it’s more important to actually finish it rather than injure myself trying to do it all by hand. My dream is to someday do a project using only historical techniques all the way from raw fleece to finished piece…but I think that will be a very long process due to the physical limitations, so I won’t want a deadline for that one.
Thanks for showing us your process. I love your thrifty use of found materials as well.
Thank you! I do love repurposing materials & avoiding waste.
This is such a great work! I like being shown all the facets that go into a “simple brown tunic.” Labor of love, more like! Well done!
Thank you! Yes, it’s much more work than one might think from looking at it (lol)…but totally worth it!
This is brilliant! The tunic is such a great color.
Thank you! I’m pleased by the result — it’s the color I was hoping for when I started the project.
This was such a fun project. I really enjoyed the components of your project and the video clips of your process. Very well done.
Thank you! It was definitely fun…glad you liked it!
Making your own natural dyes is so hard core – well done!! I appreciate the science and skill that went into this
…and I totally relate to trying to rinse out your garb in the bath tub 😂😂
Thank you! I would like to experiment more with it…now I’ve caught the bug. 😂
(And lollll…it’s such a pain, right? Literally & figuratively.)
Sister Gudrun, I really appreciate how you’ve used materials at hand, experimented with period processes, and composed a clear presentation. But most of all I love the color you created and that it’s a Foresters Guild related project. Great work!
Thank you, Brother Seamus! We’re building up our kit, little by little…hopefully by the time we can all get together again, we’ll have a more complete set so we can be ready for some more Foresters Guild events!
This is such a great project, Sister Gudrun!! I am so impressed with your process. And I love the up/recycling for so many reasons, including that we know that nothing was ever really wasted, in our period.
Well done!!
Thank you, Sister Ástrídr! I had a lot of fun with it, and I agree with you — up/recycling is totally period-accurate! (Which is great, b/c I like doing that for both ecological and economical reasons.)